Water Module
Data Collection Menu
Water Module »
|
Data Collection Methods
Macroinvertebrate Monitoring
Sampling Procedures
Macroinvertebrate sampling can be split into five phases:
- site
- description,
- collecting,
- sorting,
- identification, and
- interpretation.
The site is described based on what type of streamside vegetation and woody debris are present. It is also important to record the habitat around the streams (i.e., forest, farm).
- Aquatic insects are collected using a kick net and a sampling guide made of PVC piping. Once collected, the organisms are sorted by general appearance so that individual organisms can then be identified. Identification is done by using pictures, line drawings, reference collections, and keys. That information is then entered onto a form where the numbers are used to determine the predominant types of insects present in the sample. These numbers are then used to interpret whether water quality factors might be affecting the insect population.
Site Descriptions
When you first arrive at your site, take some time to fill out Data Sheet A.
The site characteristics box is important because it provides insights when it comes to interpreting the data.
Collections
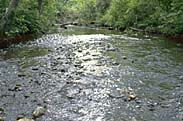
- Standing on the bank of the stream, locate a riffle
area. If you monitor the site on a regular basis you should already know the approximate location of the riffle.
- Within the riffle, select an area which is typical of the riffle as a whole.
- Clear the sampling net of any debris left over from the last time the net was used and check the PVC sampling guide for cracks or breaks at the elbows.
- Approach the sampling area from downstream so as not to disturb your site and contaminate the sample.
- Place the PVC sampling guide over the space you identified from shore as the sampling area.
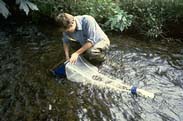
Place the bottom of the net under the downstream edge of the sampling guide to keep it lying firmly against the stream bed. The net should be perpendicular to the flow, but at a slight downstream angle.
- Stand beside the sampling area and with your hands, hold each large stone or object in front of the net and below the water surface as you brush all organisms from its surface using the vegetable scrub brush. Place the "clean" rocks outside the sampling area after you are certain all organisms have been removed.
- After all of the stones, twigs, and other debris two inches or larger have been brushed off, use the garden tool to disturb the sampling area. Start in one corner of the PVC sampling guide and methodically move the tool in a raking motion along the edges. Once you have gone around the perimeter of the guide, move the tool back and forth across the sampling area working from upstream to downstream. This process should take around 60 seconds.
- Getting the net out of the water without losing the sample is tricky! Carefully lift the PVC guide from off the top of the net and rub off any organisms that might have been trapped between the net and the PVC pipe. Remove the net with a forward scooping motion being careful not to let the water flow over the top of the net.
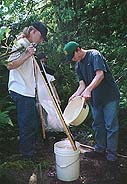
- Fold the net in half so that the dowels are together. Hold the net slightly above the stream and carefully splash water on it working from the top of the sample down to the fold. Place the net into the bucket and use your hands and the plastic spoons to scoop the sample into the bucket. You can use water from the stream to wash the sample off of the net. Once the entire sample is in the bucket, check the net for strays and lay it aside.
Sorting
- You will be responsible for sorting and identifying all of the organisms in the bucket. This should be done one scoop at a time.
- Using the scoop, transfer a portion of the sample from the bucket to the sorting tray. Sort the bugs by picking out organisms with the spoons, tweezers, and eye droppers.
- At this point don't worry about identifying the insects. Quickly separate them by likeness (i.e. similar shapes, sizes, colors, etc.) and put them into the various chambers of the ice cube trays. Be sure to cover the organisms in the tray with water.
- Once you have sorted all of the organisms in the first scoop, return the water to the creek and transfer another portion of the sample from the bucket to the tray. Once again, separate out like organisms and put them into the ice cube tray. Repeat this process until you have gone through the whole sample. You are now ready to identify and enter the information on the data sheets.
Identification
- Once the organisms are in the ice cube trays, you can begin to identify them by using the drawings, pictures, reference collection, or keys. At first this seems like an overwhelming task, but the more you do it, the easier and faster it becomes.
- Go back through each chamber and determine whether or not all of the organisms in that chamber are indeed the same. If you have any question about a particular critter, pull it out and put it in another chamber. Once you have all like organisms in a single chamber, all you have to do is identify one of them.
- Count the number of each type or organism and enter the number on Data Sheet B.
- Once you have identified all of the organisms in the sample and have entered their number on Data Sheet B, return all organisms to the stream. If you can not identify some of the insects, just note how many were un-identifiable and make a sketch if possible.
- Once the numbers of organisms have been compiled, do the necessary calculations on Data Sheet C to determine the water quality for your stream site. This can be done in the field or when you return home.
|
|
